Working with branches
This part has a small setup stage. Run 04_setup.sh if you want to follow along.
Branching is one of the topics where git shines. Git allows for lightweight branching and therefore for easy experiments. We will not go into discussion about branching strategies. This is something your team has to decide and find out. However, if you want to read up, have a look at this article by Martin Fowler about Patterns for Managing Source Code Branches.
Creating a branch
All you need to do to create a branch in git is use the
git branch branchName command. It will create a second ref
entry, named like your branch name and put the current commit hash into.
If you use git branch without providing it with a branch
name it will list your branches.
$ ls -l
total 0
-rw-rw-r-- 1 martin martin 0 Jul 17 00:19 file1
$ git branch
* main
$ git status --short
We are on a main branch and one file is present. This file is tracked
and not changed as the git status output tells us.
We will now do three things, look at the content of HEAD, look at the
content of .git/refs/heads and the content of these files
before and after we create a branch.
$ cat .git/HEAD
ref: refs/heads/main
$ ls .git/refs/heads
main
$ cat .git/refs/heads/main
66eecc4254266d583817205576bab67ff44b91ee
$ git log --oneline
66eecc4 initial commit
We see our HEAD points to refs/heads/main and this
points to the first commit. Nothing new. Now we create a branch.
$ git branch mybranch
$ cat .git/HEAD
ref: refs/heads/main
$ ls .git/refs/heads
main
mybranch
$ cat .git/refs/heads/main
66eecc4254266d583817205576bab67ff44b91ee
$ cat .git/refs/heads/mybranch
66eecc4254266d583817205576bab67ff44b91ee
Git created a second file in .git/refs/heads which is
called mybranch just as the branch name. The content is the
same as for the main file and the HEAD still points to the
main branch ref. Git basically creates a new pointer to the value of the
current HEAD. In our case to the tip of the main branch.
Switching Branches
Now we want to switch to our newly created branch. We have to options
git checkout and git switch. We will use the
newer git switch.
Again, let's look at the value of the HEAD before and after.
$ cat .git/HEAD
ref: refs/heads/main
$ git switch mybranch
$ cat .git/HEAD
ref: refs/heads/mybranch
Git just points HEAD to the new ref. If we now commit, we will update
.git/refs/heads/mybranch and not the ref for main. That's
it. That is branching with git.
Of course there are switches for git switch to speed up
things.
| command | |
|---|---|
| git switch -c branchName | create branch and switch to it |
| git switch - | switch back to the branch you came from |
Renaming a branch
If a branch name is only a file name it surely can be renamed. Use
git branch -m newName to rename the branch you are on. Be
aware, renaming is a completely local operation. If you are
collaboration no one will know you renamed the branch in your repository
clone.
Conflicts
Before we talk about moving content from one branch to another. Let's quickly talk about conflicts. If a file is changed in more then one branch, chances are hight there will be a structural conflict. Git is not very clever in resolving those conflicts automatically. It will prompt you for help. A conflict looks like this:
base line
<<<<<<< HEAD
added on main
=======
added on mybranch
>>>>>>> mybranch
From <<<<<<< HEAD to
====== is what we have on the branch we are applying this
change to. There is even a special diff format:
diff --cc file1
index 5c32171,e6bb0bc..0000000
--- a/file1
+++ b/file1
@@@ -1,2 -1,2 +1,6 @@@
  base line
++<<<<<<< HEAD
 +added on main
++=======
+ added on mybranch
++>>>>>>> mybranch
Compared to the normal diff, this has two columns for change markers.
++means this is content which is new on HEAD and on mybranch_+means this is content which is present on HEAD but not on mybranch+_means this is content which is present on mybranch but not on HEAD
ReReRe
Git can help you resolving conflicts which may happen more then once.
This can be the case if you perform a rebase our must merge one source
into multiple branches. It is called rerere and stands for "Reusing
Recorded Resolution". You can activate it with
git config rerere.enabled true. Now git will record your
resolutions and will try to use them if it encounters the same conflict
again. Of course there is a lot more to it. Check out the documentation.
Moving content between branches
There are multiple ways moving content from one branch to another. We will look at cherry-pick, merge and rebase.
We can group them into two broad categories.
- Applying the diff of a commit. This creates a new commit, with a new tree but possibly the same blobs. Cherry-pick does that for one commit. Rebase for a whole branch.
- Keeping the commits intact. Merge does this. If needed merge creates a merge commit with a new diff to show the differences between both branches.
Cherry pick
To perform a cherry pick we need a commit to pick. Cherry-picks work best if the commit is atomic - meaning it should only do one logical change.

We will now create a cherry pickable commit on the main
branch and pick it into mybranch. But first, assume we
already did some work on mybranch, which is not on main.
$ git switch mybranch
echo 'some work on mybranch' > work
$ git add .
git commit -am 'add work on mybranch'
[mybranch b5d81b3] add work on mybranch
 1 file changed, 1 insertion(+)
 create mode 100644 work
$ git switch main
echo 'important config' > config
$ git add .
$ git status --short
A  config
git commit -am 'add configuration fix'
[main fe5ae35] add configuration fix
 1 file changed, 1 insertion(+)
 create mode 100644 config
$ git log --oneline
fe5ae35 add configuration fix
66eecc4 initial commit
We now have the commit
fe5ae35d5b4e2ef782cd51652966b076f4f20a6c ready and want to
pick it into mybranch. We either can copy the commit hash,
type the first few digits or can use the help of
git rev-list to calculate it in the command directly.
git rev-list returns the commit hashes of all the commits
leading to the supplied endpoint, e.g. git rev-list HEAD
will print all the commits reachable from HEAD to the initial commit. If
supplied with the -n 1 switch it will only print the first
commit.
$ git switch mybranch
$ git rev-list main -n 1
fe5ae35d5b4e2ef782cd51652966b076f4f20a6c
git cherry-pick $(git rev-list main -n 1)
[mybranch e433fd3] add configuration fix
 Date: Thu Jul 17 00:19:24 2025 +0200
 1 file changed, 1 insertion(+)
 create mode 100644 config
$ git log --oneline
e433fd3 add configuration fix
b5d81b3 add work on mybranch
66eecc4 initial commit
$ git diff e433fd3f7044a00e98850187eeb19fdf0dfbe1c7..fe5ae35d5b4e2ef782cd51652966b076f4f20a6c
diff --git a/work b/work
deleted file mode 100644
index 4efabd5..0000000
--- a/work
+++ /dev/null
@@ -1 +0,0 @@
-some work on mybranch
As we can see, we created a new commit on mybranch. This
commit has a unique commit hash, the parent commit and the tree in the
commit differ from the one on main.
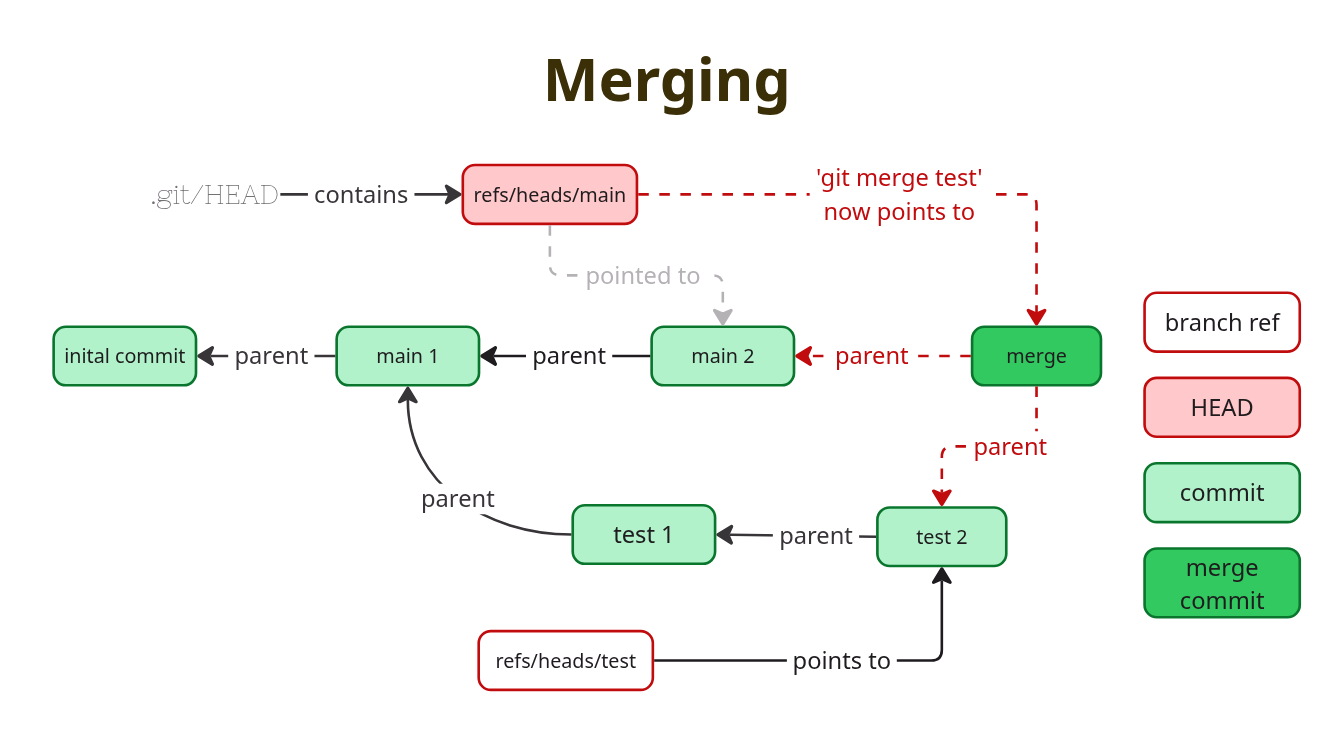
Merges
Now let's perform a simple merge. By default git does either a
ort 3-way merge or a fast-forward merge if possible. We
will first have a look at the ort strategy which replaced
the recursive strategy recently as default.
Merging is done with the git merge command and can be,
if needed, aborted with git merge --abort.
ORT Strategy
The ort strategy takes two heads and resolves them with
a 3-way merge algorithm. It can take various arguments, including
arguments like ignore-space-change and similar whitespace
aware modifiers. You can read it up here: Merge Strategies.
This strategy is uses when the two heads have diverged, meaning each
head points to commits the other one is not aware of.
Lucky for us, we have such a case. We will now merge the mybranch into main, look at the commit and at its diff.
$ git switch main
$ git merge mybranch -m 'merge mybranch'
Merge made by the 'ort' strategy.
 work | 1 +
 1 file changed, 1 insertion(+)
 create mode 100644 work
$ git show
commit eebc1321afa3f47fcb249180e296ee620dd423c8
Merge: fe5ae35 e433fd3
Author: maschmi <maschmi@maschmi.net>
Date:   Thu Jul 17 00:19:24 2025 +0200

    merge mybranch

$ git cat-file -p eebc1321afa3f47fcb249180e296ee620dd423c8
tree 20e5c2a953d3f198e78d0c7f38004f6356340262
parent fe5ae35d5b4e2ef782cd51652966b076f4f20a6c
parent e433fd3f7044a00e98850187eeb19fdf0dfbe1c7
author maschmi <maschmi@maschmi.net> 1752704364 +0200
committer maschmi <maschmi@maschmi.net> 1752704364 +0200

merge mybranch
As we can see we created a merge commit. And interestingly this
commit has two parents and according to git show has not
changed anything - no diff present. A merge commit is a special commit.
It has two parents. The first parent is always the branch you are
merging into, the second is the source branch. git show
does not know which parent to compare to, to create a diff. There are
multiple options to show the diff, we will use the
-m\' flag. For more information runman git show`.
$ git show -m
commit eebc1321afa3f47fcb249180e296ee620dd423c8 (from fe5ae35d5b4e2ef782cd51652966b076f4f20a6c)
Merge: fe5ae35 e433fd3
Author: maschmi <maschmi@maschmi.net>
Date:   Thu Jul 17 00:19:24 2025 +0200

    merge mybranch

diff --git a/work b/work
new file mode 100644
index 0000000..4efabd5
--- /dev/null
+++ b/work
@@ -0,0 +1 @@
+some work on mybranch
Now we see the change introduced by the merge commit.
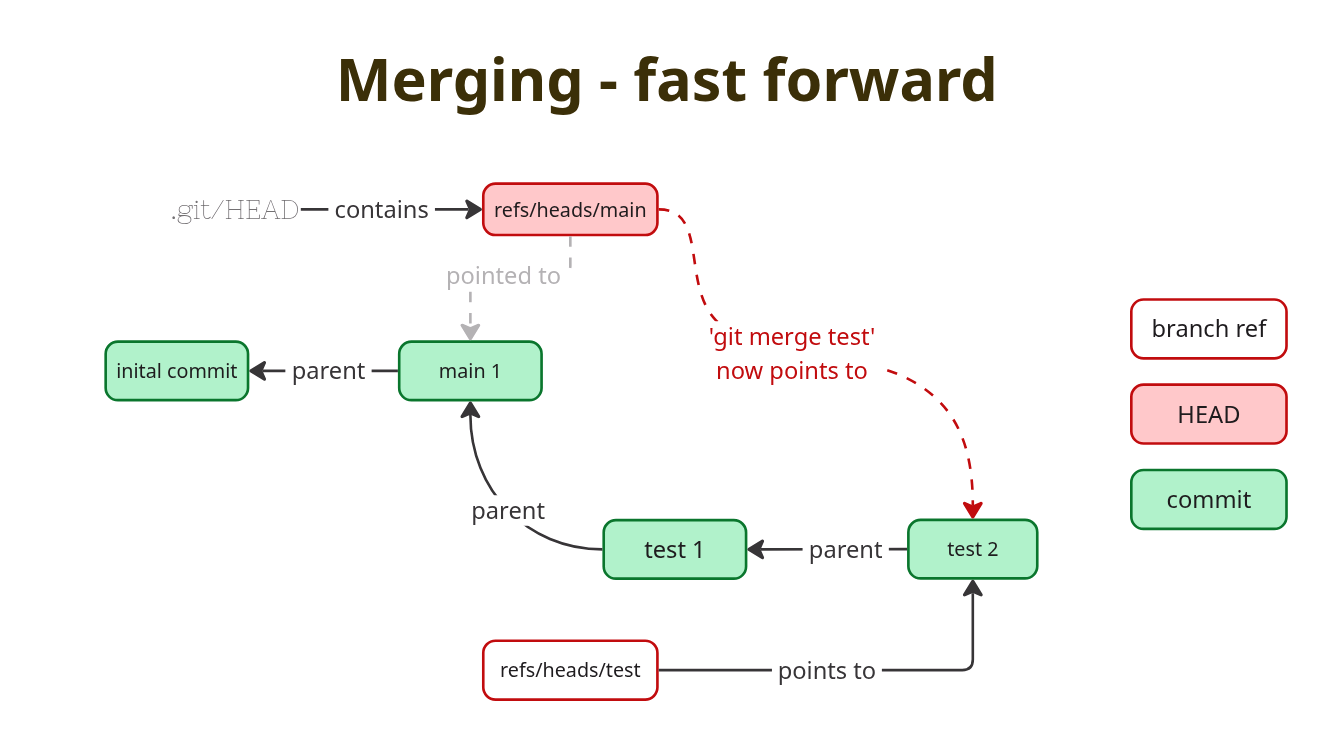
Fast Forward
A very easy way for git, and for us, is to do a fast forward merge. This only works, if the target branch we want to merge into, does not have any commits which are not already in the source branch we want to merge.
$ git switch -c fastforward
$ touch fast.forward
$ git add .
git commit -am 'add fast.forward'
[fastforward a24a54b] add fast.forward
 1 file changed, 0 insertions(+), 0 deletions(-)
 create mode 100644 fast.forward
$ git switch main
$ git merge fastforward
Updating eebc132..a24a54b
Fast-forward
 fast.forward | 0
 1 file changed, 0 insertions(+), 0 deletions(-)
 create mode 100644 fast.forward
$ git log --oneline
a24a54b add fast.forward
eebc132 merge mybranch
fe5ae35 add configuration fix
e433fd3 add configuration fix
66eecc4 initial commit
b5d81b3 add work on mybranch
We see no merge commit. It was not necessary as the main
branch had nothing on it the fastforward not yet
contained.
Reverting merge commits
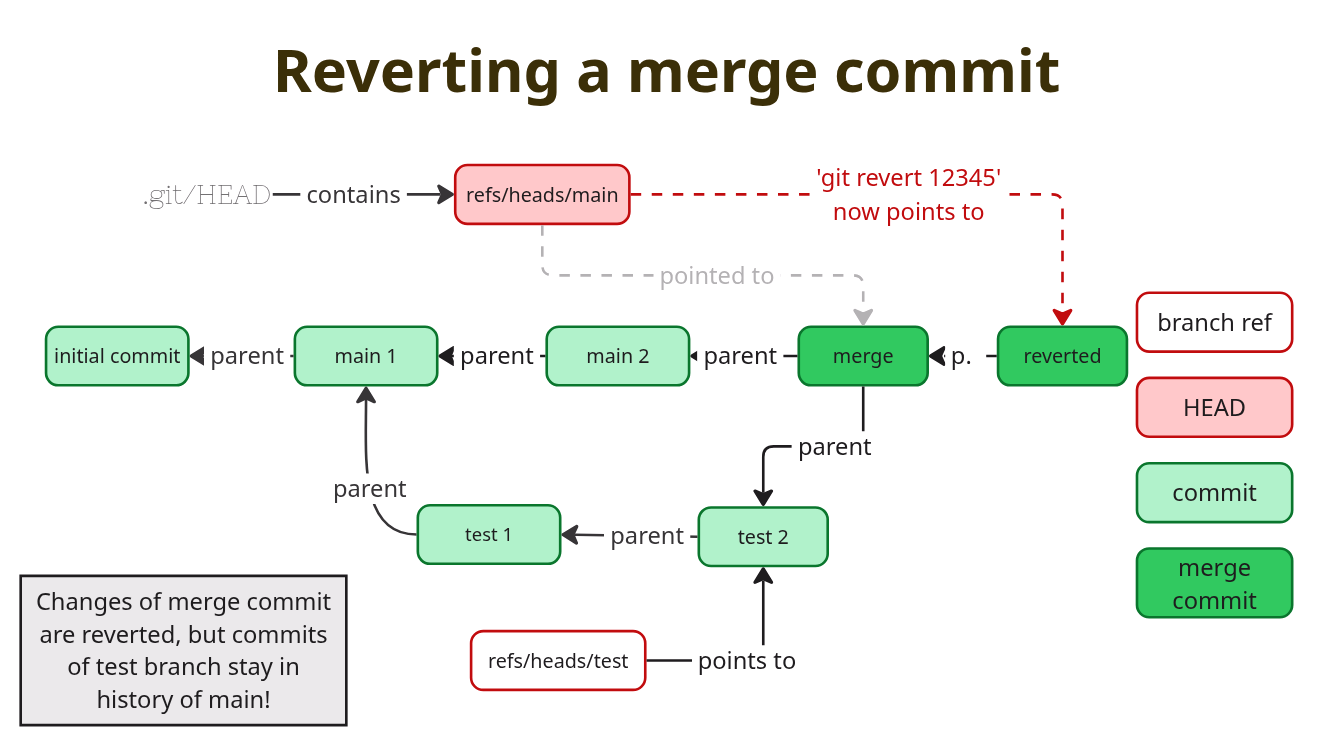
Reverting merge commits can be tricky. The best way to revert is to
reset the target branch to the commit before the merge commit. We can do
a git revert for a merge commit and git will remove the
changes introduced by it. However, git will keep the commits from the
source branch in the history and will not apply the again when we merge
the same branch a second time.
Show me the whole history
Before we go to the rebase, let's have a look at a rather helpful log
format. We can tell git log with the --all
switch to show the log for all branches. When we combine this with
--oneline and `--graph' for graph, we get a nice graph of
the history. However, it sometimes is a bit confusing to read.
git log --all --graph --oneline
* a24a54b (HEAD -> main, fastforward) add fast.forward
*   eebc132 merge mybranch
|\
| * e433fd3 (mybranch) add configuration fix
| * b5d81b3 add work on mybranch
* | fe5ae35 add configuration fix
|/
* 66eecc4 initial commit
We can read it from the top:
- HEAD points to main, fastforward and main point to the same commit
- the merge commit is also present on both branches, indicated by the
*in front of the commit hash - we can see what the merge commit merged
- now we find the commit the head of mybranch is on, this commit was
not done on either main, nor fastforward (
|and no*) - following it down towards the intial commit we can see other commits present only on mybranch or the other branches
- we also can see where mybranch was created
Rebase
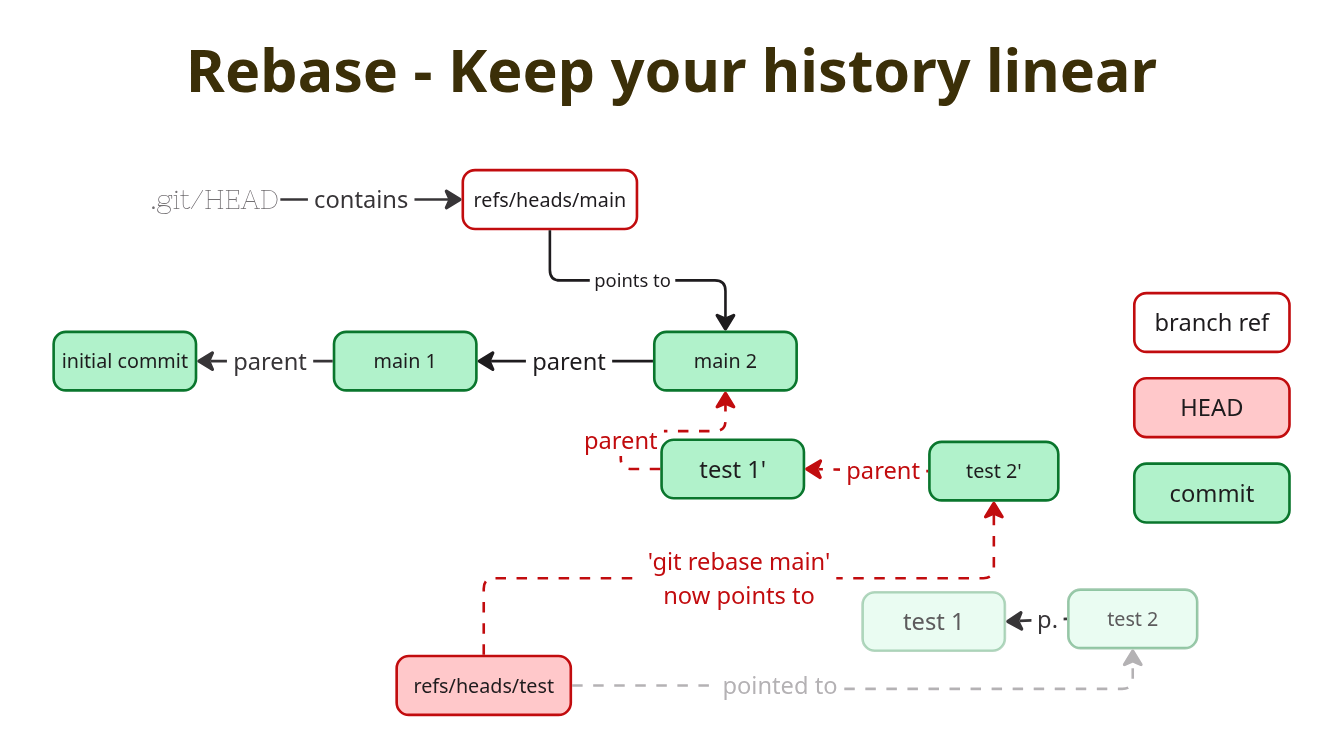
A rebase works a bit differently compared to a merge. The first difference is: You rebase your current branch on top of the source branch. The second difference is: It will change the whole history of your current branch, every commit is changed. Remember the cherry-pick? Git applied the diff of the commit on your target branch, creating a new tree and a new commit. Rebase does this for all commits on your current branch. Starting with the oldest one. After the rebase you will have a linear history. But it will also be new and tell a different story.
Exercise
Jump over to the branches exercise to get familiar with merging, conflict resolution and rebasing.